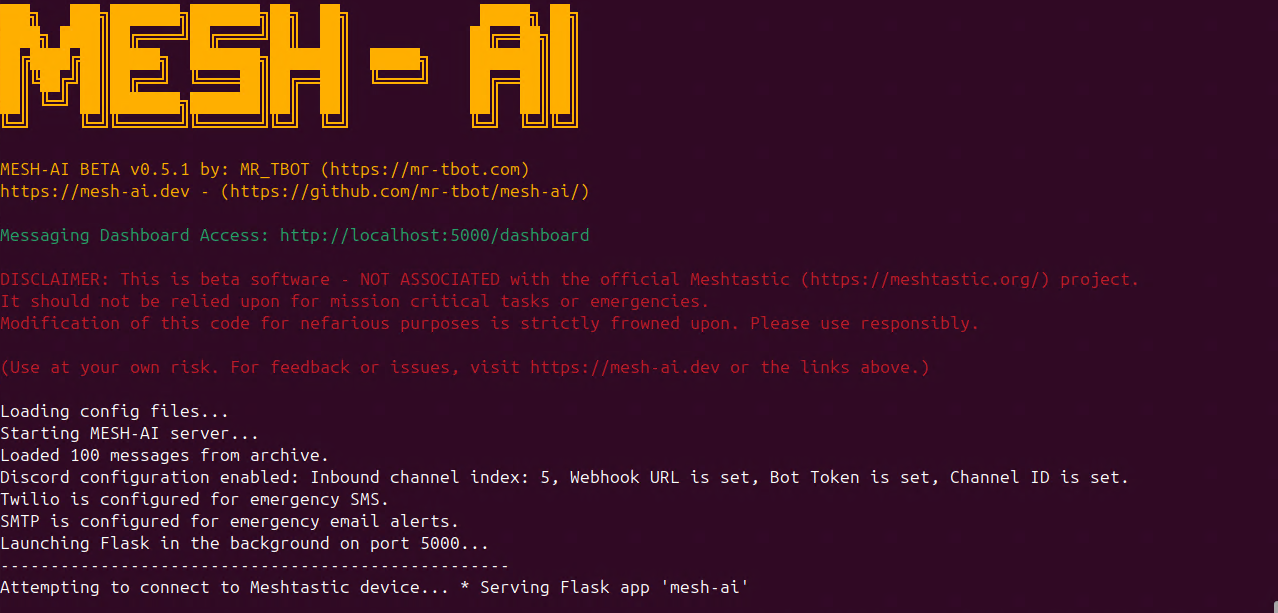
MESH-AI (BETA v0.6.0 – PRE-RELEASE 1) –
- Some updated features and packages may introduce unforeseen bugs – PLEASE REPORT ANY ISSUES ASAP BEFORE FULL PACKAGE RELEASE AND DOCKER IMAGE UPDATES.
- PLEASE NOTE – MESH-AI is out of ALPHA! There are new requirements and new config options! Old configs should work out of the box – but please see below for changes.
- PLEASE NOTE – There are new requirements and new config options – v0.6.0 updates many required library versions – and brings us into alignment with the 2.7 branch of the Meshtastic Python library! Old configs should work out of the box – but there are new config flags and a new “description” feature for custom commands in commands_config.json. Read the changelogs.
- Having issues getting up and running? As of v0.6.0 I have created a custom GPT with Open-AI to assist anyone having problems – give it a try! – https://chatgpt.com/g/g-68d86345f4c4819183c417b3790499c7-mesh-ai-setup-assistant

MESH-AI is an experimental project that bridges Meshtastic LoRa mesh networks with powerful AI chatbots. This is the FIRST BETA RELEASE!
Disclaimer:
This project is NOT ASSOCIATED with the official Meshtastic Project. It is provided solely as an extension to add AI and advanced features to your Mesh network.
BETA Software Warning:
This version is still in BETA. It may be unstable or incomplete. Please avoid relying on it for mission‑critical tasks or emergencies. Always have backup communication methods available and use responsibly.
I am one robot using other robots to write this code. Some features are still untested in the field. Check the GitHub issues for fixes or feedback!

The Meshtastic logo trademark is the trademark of Meshtastic LLC.
Features
- Multiple AI Providers
- Support for Local models (LM Studio, Ollama), OpenAI, and even Home Assistant integration.
- Home Assistant Integration
- Seamlessly forward messages from a designated channel to Home Assistant’s conversation API. Optionally secure the integration using a PIN.
- Advanced Slash Commands
- Built‑in commands: suffixed
/about-XY,/help-XY,/motd-XY,/whereami-XY, AI commands with your unique suffix (e.g.,/ai-XY,/bot-XY,/query-XY,/data-XY), unsuffixed/test, and unsuffixed/emergency(or/911), plus custom commands viacommands_config.json. - Commands are now case‑insensitive for improved mobile usability.
- New: a per-install randomized alias (e.g.
/ai-9z) is generated on first run to reduce collisions when multiple bots exist on the same mesh or MQTT network. You can change it inconfig.json(fieldai_command). All AI commands require this suffix, and other built‑ins (except emergency/911) also require your suffix. - Strongly encouraged: customize your commands in
commands_config.jsonto avoid collisions with other users.
- Built‑in commands: suffixed
- Emergency Alerts
- Trigger alerts that are sent via Twilio SMS, SMTP Email, and, if enabled, Discord.
- Emergency notifications include GPS coordinates, UTC timestamps, and user messages.
- Enhanced REST API & WebUI Dashboard
- A modern three‑column layout showing direct messages, channel messages, and available nodes. Stacks on mobile; 3‑wide on desktop. Controls (Suffix, Commands, Config, Logs) live in the “Send a Message” header (top‑right).
- Additional endpoints include
/messages,/nodes,/connection_status,/logs,/logs_stream,/send,/ui_send,/commands_info(JSON commands list), and a new/discord_webhookfor inbound Discord messages. - UI customization through settings such as theme color, hue rotation, and custom sounds.
- Config Editor (WebUI): Click the “Config” button in the header to view/edit
config.json,commands_config.json, andmotd.jsonin a tabbed editor. JSON is validated before saving; writes are atomic. Some changes may require a restart to take effect. - Emoji enhancements: each message has a React button that reveals a compact, hidden emoji picker; choosing an emoji auto‑sends a reaction (DM or channel). The send form includes a Quick Emoji bar that inserts emojis into your draft (does not auto‑send).
- Improved Message Chunking & Routing
- Automatically splits long AI responses into configurable chunks with delays to reduce radio congestion.
- Configurable flags control whether the bot replies to broadcast channels and/or direct messages.
- New: LongFast (channel 0) response toggle — by default the bot will NOT respond on LongFast to avoid congestion. Enable
ai_respond_on_longfastonly if your local mesh agrees. - Etiquette: Using AI bots on public LongFast is discouraged; keep it off unless you’re on an isolated/private mesh with community consent.
- Robust Error Handling & Logging
- Uses UTC‑based timestamps with an auto‑truncating script log file (keeping the last 100 lines if the file grows beyond 100 MB).
- Enhanced error detection (including specific OSError codes) and graceful reconnection using threaded exception hooks.
- Discord Integration Enhancements
- Route messages to and from Discord.
- New configuration options and a dedicated
/discord_webhookendpoint allow for inbound Discord message processing. - MQTT-aware response gating: set
respond_to_mqtt_messagesto true inconfig.jsonif you want the bot to respond to messages that arrive via MQTT. Off by default to prevent multiple server responses. - User‑initiated only: The AI does not auto‑message or greet new nodes; it responds only to explicit user input.
- Commands modal & startup helper
- WebUI includes a Commands modal (button in the “Send a Message” header) that lists available commands with descriptions.
- The current alias suffix and a one‑line commands list are printed at startup for easy reference.
- Windows & Linux Focused
- Official support for Windows environments with installation guides; instructions for Linux available now – MacOS coming soon!

An example of an awesome Raspberry Pi 5 powered mini terminal – running MESH-AI & Ollama with HomeAssistant integration!
- Top case model here by oinkers1: https://www.thingiverse.com/thing:6571150
- Bottom Keyboard tray model here by mr_tbot: https://www.thingiverse.com/thing:7084222
- Keyboard on Amazon here: https://a.co/d/2dAC9ph
Changelog
New Updates in v0.5.1 → v0.6.0 – SAFETY, STABILITY & COMMUNITY RESPECT
- Mesh safety defaults
- LongFast (channel 0) responses are OFF by default; enable
ai_respond_on_longfastonly if your mesh agrees. - MQTT response gating: new
respond_to_mqtt_messagesflag (defaultfalse) to prevent multiple servers from replying at once over MQTT. - Community note: Using AI bots on public LongFast channels is generally frowned upon because it increases congestion for everyone. The toggle remains available for isolated/private deployments or special cases, but it is off by default.
- LongFast (channel 0) responses are OFF by default; enable
- Bot‑loop prevention
- All AI replies now start with a tiny fixed marker
m@i(≤ 3 chars). Other MESH‑AI instances ignore messages that begin with this marker. - Each instance also remembers node IDs that send AI‑tagged messages and ignores further requests from those nodes to mitigate bot‑to‑bot chatter.
- All AI replies now start with a tiny fixed marker
- User‑initiated only
- No features are planned that allow the AI to auto‑respond to “join/arrive” events or otherwise talk without an explicit message from a legitimate user.
- Per‑install command alias
- On first run, a randomized alias (e.g.
/ai-9z) is generated and saved asai_commandinconfig.json. Use it to avoid collisions; you can change it anytime. - Strongly encouraged: customize your commands in
commands_config.jsonto minimize collisions on shared meshes/MQTT.
- On first run, a randomized alias (e.g.
- No chain‑of‑thought on mesh
- A global sanitizer removes any “thinking”/reasoning content before sending. This includes XML‑style tags (e.g.
<thinking>…</thinking>), fenced blocks, YAML/JSON meta fields, and heading lines. - Applied consistently across all providers (LM Studio, OpenAI, Ollama) and Home Assistant so only final answers are transmitted.
- A global sanitizer removes any “thinking”/reasoning content before sending. This includes XML‑style tags (e.g.
- Ollama reliability
- Added keep‑alive and request options, simple retries on transient failures, and response normalization plus sanitization for cleaner output.
- WebUI
- Fixed ticker behavior: it now correctly honors read/unread state for both DMs and channel messages, and dismissals persist across refreshes.
- Refined layout: Direct Messages, Channel Messages, and Available Nodes order; mobile stacking with 3‑wide desktop; controls moved to the “Send a Message” header (top‑right).
- New Commands modal overlay: quickly view available commands and descriptions (via the Commands button). Backed by a lightweight JSON endpoint (
/commands_info). - Scrollable panels with sensible max heights; on mobile, each panel can be collapsed/expanded for easier navigation.
- Ticker UX polish: dismiss button is reliably visible and auto‑hides after a short timeout; dismiss state is remembered across refreshes.
- Footer badge updated and repositioned: bottom‑right two‑line, centered label “MESH-AI v0.6.0 PR” and “by: MR-TBOT”.
- Emoji reactions: every message now includes a React button that toggles a hidden emoji picker; picking an emoji auto‑sends a reaction (works for both DMs and channel messages).
- Quick Emoji bar: the “Send a Message” form includes common emojis; clicking inserts into your draft at the cursor without auto‑sending.
- Reaction feedback: React buttons show Sending/Sent/Failed states and temporarily disable during send to prevent accidental double‑presses.
- Docs & help
- Updated README and in‑app
/helpto highlight safety defaults, MQTT gating, and your unique alias. - New config keys summarized above; defaults favor safety and reduce congestion.
- Updated README and in‑app
New Updates in v0.4.2 → v0.5.1 – NOW IN BETA!
- REBRANDED TO MESH-AI
- WebUI Enhancements
- Node Search added for easier node management.
- Channel Message Organization with support for custom channels in
config.json. - Revamped DM threaded messaging system.
- Location Links for nodes with available location data via Google Maps.
- Timezone Selection for accurate incoming message timestamps.
- Custom Local Sounds for message notifications (no longer relying on hosted files).
- Logs Page Auto-Refresh for live updates.
- Baudrate Adjustment
- Configurable baud rate in
config.jsonfor longer USB connections (e.g., roof nodes).
- Configurable baud rate in
- LM Studio Model Selection
- Support for selecting models when multiple are loaded in LM Studio, enabling multi-model instances.
- Protobuf Noise Debugging
- Moved any protobuf-related errors behind debug logs as they do not affect functionality.
- Can be enabled by setting
"debug": trueinconfig.jsonto track.
- Updated Docker Support
- Updated Docker configuration to always pull/build the latest Meshtastic-Python libraries, ensuring compatibility with Protobuf versions.
POSSIBLE BUGS IN BETA v0.5.1 – Web UI ticker isn’t honoring read messages in some cases.
INCOMING MESSAGE SOUNDS ARE UNTESTED ON ALL PLATFORMS AND FILESYSTEMS.
New Updates in v0.4.1 → v0.4.2
- Initial Ubuntu & Ollama Unidecode Support: –
- User @milo_o – Thank you so much! I have merged your idea into the main branch – hoping this works as expected for users – please report any problems! – #19
- Emergency Email Google Maps Link:
- Emergency email now includes a Google Maps link to the sender’s location, rather than just coordinates. – Great call, @Nlantz79! (Remember – this is only as accurate as the sender node’s location precision allows!)
New Updates in v0.4.0 → v0.4.1
- Error Handling (ongoing):
- Trying a new method to handle WinError exceptions – which though much improved in v0.4.0 – still occur under the right connection circumstances – especially over Wi-Fi.
(UPDATE: My WinError issues were being caused by a combination of low solar power, and MQTT being enabled on my node. MQTT – especially using LongFast is very intense on a node, and can cause abrupt connection restarts as noted here: meshtastic/meshtastic#901 – but – now the script is super robust regardless for handling errors!)
- Trying a new method to handle WinError exceptions – which though much improved in v0.4.0 – still occur under the right connection circumstances – especially over Wi-Fi.
- Emergency Email Subject:
- Email Subject now includes the long name, short name & Node ID of the sending node, rather than just the Node ID.
- INITIAL Docker Support
New Updates in v0.3.0 → v0.4.0
- Logging & Timestamps:
- Shift to UTC‑based timestamps and enhanced log management.
- Discord Integration:
- Added configuration for inbound/outbound Discord message routing.
- Introduced a new
/discord_webhookendpoint for processing messages from Discord.
- Emergency Notifications:
- Expanded emergency alert logic to include detailed context (GPS data, UTC time) and Discord notifications.
- Sending and receiving SMS:
- Send SMS using
/sms <+15555555555> <message> - Config options to either route incoming Twilio SMS messages to a specific node, or a channel index.
- Send SMS using
- Command Handling:
- Made all slash commands case‑insensitive to improve usability.
- Enhanced custom command support via
commands_config.jsonwith dynamic AI prompt insertion.
- Improved Error Handling & Reconnection:
- More granular detection of connection errors (e.g., specific OSError codes) and use of a global reset event for reconnects.
- Code Refactoring:
- Overall code improvements for maintainability and clarity, with additional debug prints for troubleshooting.
Changelog: v0.2.2 → v0.3.0 (from the original Main Branch README)
- WebUI Overhaul:
- Redesigned three‑column dashboard showing channel messages, direct messages, and node list.
- New send‑message form with toggleable modes (broadcast vs. direct), dynamic character counting, and message chunk preview.
- Improved Error Handling & Stability:
- Redirected stdout/stderr to a persistent
script.logfile with auto‑truncation. - Added a connection monitor thread to detect disconnections and trigger automatic reconnects.
- Implemented a thread exception hook for better error logging.
- Redirected stdout/stderr to a persistent
- Enhanced Message Routing & AI Response Options:
- Added configuration flags (
reply_in_channelsandreply_in_directs) to control AI responses. - Increased maximum message chunks (default up to 5) for longer responses.
- Updated slash command processing (e.g., added
/about) and support for custom commands.
- Added configuration flags (
- Expanded API Endpoints:
- New endpoints:
/nodes, updated/connection_status, and/ui_send.
- New endpoints:
- Additional Improvements:
- Robust Home Assistant integration and basic emergency alert enhancements.
1. Changelog: v0.1 → v0.2.2
- Expanded Configuration & JSON Files
- New
config.jsonfields- Added
debugtoggle for verbose debugging. - Added options for multiple AI providers (
lmstudio,openai,ollama), including timeouts and endpoints. - Introduced Home Assistant integration toggles (
home_assistant_enabled,home_assistant_channel_index, secure pin, etc.). - Implemented Twilio and SMTP settings for emergency alerts (including phone number, email, and credentials).
- Added Discord webhook configuration toggles (e.g.,
enable_discord,discord_send_emergency, etc.). - Several new user-configurable parameters to control message chunking (
chunk_size,max_ai_chunks, andchunk_delay) to reduce radio congestion.
- Added
- New
- Support for Multiple AI Providers
- Local Language Models (LM Studio, Ollama) and OpenAI (GPT-3.5, etc.) can be selected via
ai_provider. - Behavior is routed depending on which provider you specify in
config.json.
- Local Language Models (LM Studio, Ollama) and OpenAI (GPT-3.5, etc.) can be selected via
- Home Assistant Integration
- Option to route messages on a dedicated channel directly to Home Assistant’s conversation API.
- Security PIN requirement can be enabled, preventing unauthorized control of Home Assistant.
- Improved Command Handling
- Replaced single-purpose code with a new, flexible commands system loaded from
commands_config.json. - Users can define custom commands that either have direct string responses or prompt an AI.
- Built-in commands now include
/ping,/test,/emergency,/whereami,/help,/motd, and more.
- Replaced single-purpose code with a new, flexible commands system loaded from
- Emergency Alert System
/emergency(or/911) triggers optional Twilio SMS, SMTP email, and/or Discord alerts.- Retrieves node GPS coordinates (if available) to include location in alerts.
- Improved Message Chunking & Throttling
- Long AI responses are split into multiple smaller segments (configurable via
chunk_size&max_ai_chunks). - Delays (
chunk_delay) between chunks to avoid flooding the mesh network.
- Long AI responses are split into multiple smaller segments (configurable via
- REST API Endpoints (via built-in Flask server)
GET /messages: Returns the last 100 messages in JSON.GET /dashboard: Displays a simple HTML dashboard showing the recently received messages.POST /send: Manually send messages to nodes (direct or broadcast) from external scripts or tools.
- Improved Logging and File Structure
messages.logfor persistent logging of all incoming messages, commands, and emergencies.- Distinct JSON config files:
config.json,commands_config.json, andmotd.json.
- Refined Startup & Script Structure
- A new
Run MESH-AI - Windows.batscript for straightforward Windows startup. - Added disclaimers for alpha usage throughout the code.
- Streamlined reconnection and exception handling logic with more robust error-handling.
- A new
- General Stability & Code Quality Enhancements
- Thorough refactoring of the code to be more modular and maintainable.
- Better debugging hooks, improved concurrency handling, and safer resource cleanup.
Quick Start (Windows)
- Download/Clone
- Clone the repository or copy the mesh-ai folder to your Desktop. (Rename and remove “-main” tag from the folder name if downloading as ZIP)
- Install Dependencies:
- Create a virtual environment:cd path\to\mesh-ai python -m venv venv venv\Scripts\activate
- Upgrade pip and install required packages:pip install –upgrade pip pip install -r requirements.txt
- Configure Files:
- Edit
config.json,commands_config.json, andmotd.jsonas needed. Refer to the Configuration section below.
- Edit
- Start the Bot:
- Run the bot by double‑clicking
Run MESH-AI - Windows.bator by executing:python mesh-ai.py
- Run the bot by double‑clicking
- Access the WebUI Dashboard:
- Open your browser and navigate to http://localhost:5000/dashboard.
Quick Start (Ubuntu / Linux)
- Download/Clone
- Clone the repository or copy the mesh-ai folder to your preferred directory:git clone https://github.com/mr-tbot/mesh-ai.git cd mesh-ai
- Create and Activate a Virtual Environment Named
mesh-ai:- Create the virtual environment:python3 -m venv mesh-ai
- Activate the virtual environment:source mesh-ai/bin/activate
- Install Dependencies:
- Upgrade pip and install the required packages:pip install –upgrade pip pip install -r requirements.txt
- Configure Files:
- Edit
config.json,commands_config.json, andmotd.jsonas needed. Refer to the Configuration section in the documentation for details.
- Edit
- Start the Bot:
- Run the bot by executing:python mesh-ai.py
- Access the WebUI Dashboard:
- Open your browser and navigate to http://localhost:5000/dashboard.
Quick Start (Docker)
- Prerequisites
- Docker installed on your host (Linux, macOS, Windows or Raspberry Pi). (Current Images Built for Linux x86 & ARM64 Raspberry Pi)
- Docker support is currently untested on Windows & MacOS, and the Raspberry Pi image remains fresh and untested – please report back!
- A Meshtastic device connected via USB or WiFi (No Bluetooth testing Done as of yet)
- If needed,uncomment USB sections and set identifiers such as
/dev/ttyUSB0or\\.\COM3.
- Prepare the Volume Structure
- In the root of your project directory:
- Extract the “docker-required-volumes.zip” – The included “config” & “logs” folders should be within your “mesh-ai folder”
- This file structure differs from the standard release to accommodate volumes for docker
- These files are placed in order to prevent docker from replacing these with directories on first start and throwing errors.
- Make any changes to config files as needed before moving forward.
File structure should look like this:
mesh-ai/
├── config/
│   ├── config.json
│   ├── commands_config.json
│   └── motd.json
└── logs/
 ├── script.log
 ├── messages.log
 └── messages_archive.json
- Pull & run the Docker Image using docker-compose
- An example docker-compose-yaml is included in the github repository – please adjust as needed.
- From the project directory, run:
- Access the WebUI Dashboard:
- Open your browser and navigate to http://localhost:5000/dashboard.
Basic Usage
- Interacting with the AI:
- Use your randomized alias shown at startup (e.g.,
/ai-9z) — AI commands require the suffix:/ai-9z,/bot-9z,/query-9z,/data-9zfollowed by your message. - To avoid collisions (multiple bots responding), prefer your unique alias and/or customize commands in
commands_config.json. - For direct messages, simply DM the AI node if configured to reply.
- Use your randomized alias shown at startup (e.g.,
- Location Query:
- Send
/whereami-XY(replaceXYwith your suffix) to retrieve the node’s GPS coordinates (if available).
- Send
- Emergency Alerts:
- Trigger an emergency using
/emergency <message>or/911 <message>.- These commands send alerts via Twilio, SMTP, and Discord (if enabled), including GPS data and timestamps.
- Trigger an emergency using
- Sending and receiving SMS:
- Send SMS using your suffixed command, e.g.,
/sms-9z <+15555555555> <message> - Config options to either route incoming Twilio SMS messages to a specific node, or a channel index.
- Send SMS using your suffixed command, e.g.,
- Home Assistant Integration:
- When enabled, messages sent on the designated Home Assistant channel (as defined by
"home_assistant_channel_index") are forwarded to Home Assistant’s conversation API. - In secure mode, include the PIN in your message (format:
PIN=XXXX your message).
- When enabled, messages sent on the designated Home Assistant channel (as defined by
- WebUI Messaging:
- Use the dashboard’s send‑message form to send broadcast or direct messages. The mode toggle and node selection simplify quick replies.
WebUI Config Editor (new)
- Open the dashboard and click the “Config” button in the header (next to Commands/Logs).
- A tabbed editor appears with three files:
config.json— core app settings (providers, timeouts, routing, integrations, etc.)commands_config.json— custom slash commands and AI promptsmotd.json— the Message of the Day string shown in the UI
- Make edits and click Save. The editor validates JSON before saving (for JSON files) and writes changes atomically to prevent partial/corrupted updates.
- Changes to some settings may require restarting the app/container to take effect (e.g., provider, connectivity, or Discord/Twilio credentials).
- Security note: If you expose the WebUI beyond localhost, protect access to the dashboard since configuration files may contain secrets (API keys, tokens).
How AI messages are identified and ignored by other bots
- AI responses include a very short prefix marker
m@iat the start of the message body. This is not configurable on purpose and is capped at 3 characters to conserve airtime. - Other MESH-AI instances will ignore messages that start with this marker, preventing bots from talking to each other.
- Each instance also tracks node IDs that have sent AI-tagged messages and ignores further messages from those nodes.
What is bot‑looping and why is it a problem?
- Bot‑looping happens when two or more automated agents see each other’s messages as prompts and keep replying back and forth without a human in the loop.
- On a constrained LoRa mesh, this can quickly saturate airtime (especially on LongFast), drain batteries, and crowd out legitimate traffic.
- Loops can be surprisingly hard to break because:
- Messages may be re‑broadcast via MQTT and multiple gateways, multiplying replies.
- Nodes can buffer/retry after brief outages, re‑triggering the loop even if you silence one side.
- Different bots might parse/quote each other in ways that keep producing “valid” prompts.
- MESH‑AI mitigations:
- A fixed 3‑char marker (
m@i) at the start of AI replies so other instances will ignore them. - A memory of node IDs that have emitted AI‑tagged messages to avoid engaging those nodes.
- Conservative defaults: no LongFast replies by default and MQTT response gating disabled by default.
- Policy: the AI never initiates conversations or responds to arrival/presence events—only explicit human messages.
- A fixed 3‑char marker (
Using the API
The MESH-AI server (running on Flask) exposes the following endpoints:
- GET
/messages
Retrieve the last 100 messages in JSON format. - GET
/nodes
Retrieve a live list of connected nodes as JSON. - GET
/connection_status
Get current connection status and error details. - GET
/logs
View a styled log page showing uptime, restarts, and recent log entries. - GET
/logs_stream
Stream recent logs in JSON for lightweight polling. - GET
/dashboard
Access the full WebUI dashboard. - GET
/commands_info
Retrieve a JSON list of available commands and descriptions (used by the in‑app Commands modal). - GET
/config_editor/load
Load the current contents ofconfig.json,commands_config.json, andmotd.jsonfor the WebUI Config Editor. - POST
/config_editor/save
Save updates to the above files. Payload is validated (JSON where applicable) and written atomically. Some settings require an app restart to apply. - POST
/sendand POST/ui_send
Send messages programmatically. - POST
/discord_webhook
Receive messages from Discord (if configured).
Configuration
Your config.json file controls almost every aspect of MESH-AI. Below is an example configuration that includes both the previous settings and the new options:
{
  "debug": false,
  "use_mesh_interface": false,  // Set to true if using the Meshtastic mesh interface instead of WiFi
  "use_wifi": true,  // Set to false if using a serial connection instead of WiFi
  "wifi_host": "MESHTASTIC NODE IP HERE",  // IP address of your Meshtastic device if using WiFi
  "wifi_port": 4403,  // Default port for WiFi connection

  "serial_port": "",  // Set the serial port if using a USB connection (e.g., /dev/ttyUSB0 on Linux or COMx on Windows)
  // "serial_baud": 460800,  // Set baud rate for long USB runs or subpar USB connections (uncomment to use)

  "ai_provider": "lmstudio, openai, or ollama",  // Select the AI provider: "lmstudio", "openai", or "ollama"
  "system_prompt": "You are a helpful assistant responding to mesh network chats. Respond in as few words as possible while still answering fully.",  // System prompt for AI interaction

  "lmstudio_url": "http://localhost:1234/v1/chat/completions",  // URL for LM Studio's API
  // "lmstudio_chat_model": "MODEL IDENTIFIER HERE",  // LM Studio chat model (uncomment and specify if using LM Studio)
  // "lmstudio_embedding_model": "TEXT EMBEDDING MODEL IDENTIFIER HERE",  // LM Studio embedding model (uncomment and specify if using LM Studio)
  "lmstudio_timeout": 60,  // Timeout in seconds for LM Studio API requests

  "openai_api_key": "",  // API key for OpenAI (leave empty if not using OpenAI)
  "openai_model": "gpt-4.1-mini",  // OpenAI model to use (e.g., "gpt-4.1-mini" or "gpt-3.5-turbo")
  "openai_timeout": 60,  // Timeout in seconds for OpenAI API requests

  "ollama_url": "http://localhost:11434/api/generate",  // URL for Ollama's API
  "ollama_model": "llama3",  // Ollama model (e.g., "llama3")
  "ollama_timeout": 60,  // Timeout in seconds for Ollama API requests
  "ollama_keep_alive": "5m",  // Keep the selected model loaded (e.g., "5m"); set to "0" to unload immediately
  "ollama_options": {  // Optional generation options for Ollama requests
    "num_ctx": 2048,
    "temperature": 0.2
  },

  "home_assistant_url": "http://homeassistant.local:8123/api/conversation/process",  // Home Assistant API URL for conversation processing
  "home_assistant_token": "INPUT HA TOKEN HERE",  // Home Assistant API token (replace with your token)
  "home_assistant_timeout": 90,  // Timeout in seconds for Home Assistant API requests
  "home_assistant_enable_pin": false,  // Set to true to require a PIN for Home Assistant commands
  "home_assistant_secure_pin": "1234",  // PIN for Home Assistant (if enabled)

  "home_assistant_enabled": false,  // Set to true to enable Home Assistant integration
  "home_assistant_channel_index": 1,  // Index of the channel for Home Assistant messages (set to -1 if not using)

  "channel_names": {
    "0": "LongFast",  // Name for Channel 0
    "1": "Channel 1",  // Name for Channel 1
    "2": "Channel 2",  // Name for Channel 2
    "3": "Channel 3",  // Name for Channel 3
    "4": "Channel 4",  // Name for Channel 4
    "5": "Channel 5",  // Name for Channel 5
    "6": "Channel 6",  // Name for Channel 6
    "7": "Channel 7",  // Name for Channel 7
    "8": "Channel 8",  // Name for Channel 8
    "9": "Channel 9"   // Name for Channel 9
  },

  "reply_in_channels": true,  // Set to true to allow AI to reply in broadcast channels
  "reply_in_directs": true,  // Set to true to allow AI to reply in direct messages
  "ai_respond_on_longfast": false,  // Do NOT respond on LongFast (channel 0) by default; enable only with mesh/community consent
  "respond_to_mqtt_messages": false,  // If true, the bot will respond to messages that arrived via MQTT (default false to prevent multi-replies)

  "chunk_size": 200,  // Maximum size for message chunks
  "max_ai_chunks": 5,  // Maximum number of chunks to split AI responses into
  "chunk_delay": 10,  // Delay between message chunks to reduce congestion

  "local_location_string": "@ YOUR LOCATION HERE",  // Local string for your node's location (e.g., "@ Home", "@ Roof Node")
  "ai_node_name": "Mesh-AI-Alpha",  // Name for your AI node
  "ai_command": "/ai-9z",  // Randomized per-install alias for built-in AI commands to prevent AI clashing and looping (change the suffix to your preference)
  "max_message_log": 0,  // Set the maximum number of messages to log (set to 0 for unlimited)

  "enable_twilio": false,  // Set to true to enable Twilio for emergency alerts via SMS
  "enable_smtp": false,  // Set to true to enable SMTP for emergency alerts via email
  "alert_phone_number": "+15555555555",  // Phone number to send emergency SMS alerts to (Twilio)
  "twilio_sid": "TWILIO_SID",  // Twilio SID (replace with your SID)
  "twilio_auth_token": "TWILIO_AUTH_TOKEN",  // Twilio Auth Token (replace with your Auth Token)
  "twilio_from_number": "+14444444444",  // Twilio phone number to send messages from

  "smtp_host": "SMTP HOST HERE",  // SMTP server hostname (e.g., smtp.gmail.com)
  "smtp_port": 465,  // SMTP server port (465 for SSL, or 587 for TLS)
  "smtp_user": "SMTP USER HERE",  // SMTP username (usually your email address)
  "smtp_pass": "SMTP PASS HERE",  // SMTP password (use app-specific passwords if necessary)
  "alert_email_to": "ALERT EMAIL HERE",  // Email address to send emergency alerts to

  "enable_discord": false,  // Set to true to enable Discord integration for emergency alerts and AI responses
  "discord_webhook_url": "",  // Discord Webhook URL (for sending messages to Discord)
  "discord_send_emergency": false,  // Set to true to send emergency alerts to Discord
  "discord_send_ai": false,  // Set to true to send AI responses to Discord
  "discord_send_all": false,  // Set to true to send all messages to Discord
  "discord_receive_enabled": false,  // Enable polling Discord for inbound messages
  "discord_bot_token": "",  // Discord Bot token (required if receive is enabled)
  "discord_channel_id": "",  // Discord channel ID to poll for inbound messages
  "discord_inbound_channel_index": 1  // Channel index to route inbound Discord messages into the mesh
}
Home Assistant & LLM API Integration
Home Assistant Integration
- Enable Integration:
- Set
"home_assistant_enabled": trueinconfig.json.
- Set
- Configure:
- Set
"home_assistant_url"(e.g.,http://homeassistant.local:8123/api/conversation/process). - Provide
"home_assistant_token"and adjust"home_assistant_timeout".
- Set
- Security (Optional):
- Enable
"home_assistant_enable_pin": trueand set"home_assistant_secure_pin".
- Enable
- Routing:
- Messages on the channel designated by
"home_assistant_channel_index"are forwarded to Home Assistant. - When PIN mode is enabled, include your PIN in the format
PIN=XXXX your message.
- Messages on the channel designated by
LLM API Integration
- LM Studio:
- Set
"ai_provider": "lmstudio"and configure"lmstudio_url". – optionally set model and text embedding flags as well if using more than one model on the same LM-Studio instance.
- Set
- OpenAI:
- Set
"ai_provider": "openai", provide your API key in"openai_api_key", and choose a model.
- Set
- Ollama:
- Set
"ai_provider": "ollama"and configure the corresponding URL and model.
- Set
Communication Integrations
Email Integration
- Enable Email Alerts:
- Set
"enable_smtp": trueinconfig.json.
- Set
- Configure SMTP:
- Provide the following settings in
config.json:"smtp_host"(e.g.,smtp.gmail.com)"smtp_port"(use465for SSL or another port for TLS)"smtp_user"(your email address)"smtp_pass"(your email password or app-specific password)"alert_email_to"(recipient email address or list of addresses)
- Provide the following settings in
- Behavior:
- Emergency emails include a clickable Google Maps link (generated from available GPS data) so recipients can quickly view the sender’s location.
- Note:
- Ensure your SMTP settings are allowed by your email provider (for example, Gmail may require an app password and proper security settings).
Discord Integration: Detailed Setup & Permissions

1. Create a Discord Bot
- Access the Developer Portal:
Go to the Discord Developer Portal and sign in with your Discord account. - Create a New Application:
Click on “New Application,” give it a name (e.g., MESH-AI Bot), and confirm. - Add a Bot to Your Application:
- Select your application, then navigate to the Bot tab on the left sidebar.
- Click on “Add Bot” and confirm by clicking “Yes, do it!”
- Customize your bot’s username and icon if desired.
2. Set Up Bot Permissions
- Required Permissions:
Your bot needs a few basic permissions to function correctly:- View Channels: So it can see messages in the designated channels.
- Send Messages: To post responses and emergency alerts.
- Read Message History: For polling messages from a channel (if polling is enabled).
- Manage Messages (Optional): If you want the bot to delete or manage messages.
- Permission Calculator:
Use a tool like Discord Permissions Calculator to generate the correct permission integer.
For minimal functionality, a permission integer of 3072 (which covers “Send Messages,” “View Channels,” and “Read Message History”) is often sufficient.
3. Invite the Bot to Your Server
- Generate an Invite Link:
ReplaceYOUR_CLIENT_IDwith your bot’s client ID (found in the General Information tab) in the following URL:https://discord.com/api/oauth2/authorize?client_id=YOUR_CLIENT_ID&permissions=3072&scope=bot - Invite the Bot:
Open the link in your browser, select the server where you want to add the bot, and authorize it. Make sure you have the “Manage Server” permission in that server.
4. Configure Bot Credentials in config.json
Update your configuration file with the following keys (replace placeholder text with your actual values):
{
  "enable_discord": true,
  "discord_webhook_url": "YOUR_DISCORD_WEBHOOK_URL",
  "discord_receive_enabled": true,
  "discord_bot_token": "YOUR_BOT_TOKEN",
  "discord_channel_id": "YOUR_CHANNEL_ID",
  "discord_inbound_channel_index": 1,  // or the channel number you prefer
  "discord_send_ai": true,
  "discord_send_emergency": true
}
- discord_webhook_url:
Create a webhook in your desired Discord channel (Channel Settings → Integrations → Webhooks) and copy its URL. - discord_bot_token & discord_channel_id:
Copy your bot’s token from the Developer Portal and enable message polling by specifying the channel ID where the bot should read messages.
To get a channel ID, enable Developer Mode in Discord (User Settings → Advanced → Developer Mode) then right-click the channel and select “Copy ID.”
5. Polling Integration (Optional)
- Enable Message Polling:
Set"discord_receive_enabled": trueto allow the bot to poll for new messages. - Routing:
The configuration key"discord_inbound_channel_index"determines the channel number used by MESH-AI for routing incoming Discord messages. Make sure it matches your setup.
6. Testing Your Discord Setup
- Restart MESH-AI:
With the updated configuration, restart your bot. - Check Bot Activity:
Verify that the bot is present in your server, that it can see messages in the designated channel, and that it can send responses. - Emergency Alerts & AI Responses:
Confirm that emergency alerts and AI responses are being posted in Discord as per your configuration ("discord_send_ai": trueand"discord_send_emergency": true).
7. Troubleshooting Tips
- Permissions Issues:
If the bot isn’t responding or reading messages, double-check that its role on your server has the required permissions. - Channel IDs & Webhook URLs:
Verify that you’ve copied the correct channel IDs and webhook URLs (ensure no extra spaces or formatting issues). - Bot Token Security:
Keep your bot token secure. If it gets compromised, regenerate it immediately from the Developer Portal.
Twilio Integration
- Enable Twilio:
- Set
"enable_twilio": trueinconfig.json.
- Set
- Configure Twilio Credentials:
- Provide your Twilio settings in
config.json:"twilio_sid": "YOUR_TWILIO_SID""twilio_auth_token": "YOUR_TWILIO_AUTH_TOKEN""twilio_from_number": "YOUR_TWILIO_PHONE_NUMBER""alert_phone_number": "DESTINATION_PHONE_NUMBER"(the number to receive emergency SMS)
- Provide your Twilio settings in
- Usage:
- When an emergency is triggered, the bot sends an SMS containing the alert message (with a Google Maps link if GPS data is available).
- Tip:
- Follow Twilio’s setup guide to obtain your SID and Auth Token, and ensure that your phone numbers are verified.
Other Important Settings
- Logging & Archives:
- Script logs are stored in
script.logand message logs inmessages.log. - An archive is maintained in
messages_archive.jsonto keep recent messages.
- Script logs are stored in
- Device Connection:
- Configure the connection method for your Meshtastic device by setting either the
"serial_port"or enabling"use_wifi"along with"wifi_host"and"wifi_port". - Alternatively, enable
"use_mesh_interface"if applicable. - Baud Rate is optionally set if you need – this is for longer USB runs (roof nodes connected via USB) and bad USB connections.
- Configure the connection method for your Meshtastic device by setting either the
- Message Routing & Commands:
- Custom commands can be added in
commands_config.json. - The WebUI Dashboard (accessible at http://localhost:5000/dashboard) displays messages and node status.
- Custom commands can be added in
- AI Provider Settings:
- Adjust
"ai_provider"and related API settings (timeouts, models, etc.) for LM Studio, OpenAI, Ollama, or Home Assistant integration.
- Adjust
- Security:
- If using Home Assistant with PIN protection, follow the specified format (
PIN=XXXX your message) to ensure messages are accepted.
- If using Home Assistant with PIN protection, follow the specified format (
- Testing:
- You can test SMS sending with your suffixed
/sms-XYcommand or trigger an emergency alert to confirm that Twilio and email integrations are functioning.
- You can test SMS sending with your suffixed
Contributing & Disclaimer
- Beta Software Notice:
This release (v0.6.0) is in BETA. Expect ongoing changes that may affect existing features. Field testing is recommended before production use. - Feedback & Contributions:
Report issues or submit pull requests on GitHub. Your input is invaluable. - Use Responsibly:
Modifying this code for nefarious purposes is strictly prohibited. Use at your own risk.
Donations are GRACIOUSLY accepted to stoke development!
- PayPal:
https://www.paypal.com/ncp/payment/XPW23EP9XHMYS - BTC:
bc1qcfstyxaktw5ppnsm5djmpvmgv49z0cp6df33tl - XRP:
TrpgvB8EgTtqhU1W6XJAvx3CS8KKkRwTLHc - DOGE:
D5MyXVRkwLW9XzcKjjcwEHcXvnaTFueZhy
Conclusion
MESH-AI BETA v0.6.0 builds on the v0.5.1 foundation with safer defaults, improved resilience, and a more usable WebUI (commands modal, better layout, and clearer startup info). Whether you’re chatting directly with your node, integrating with Home Assistant, or leveraging multi‑channel alerting (Twilio, Email, Discord), this release offers a more comprehensive and reliable off‑grid AI assistant experience.
Enjoy tinkering, stay safe, and have fun!
Please share your feedback or join our community on GitHub.
Related Posts

Swinging HARD into 2026…

TBOT’s Logo Rotate for Resolume Arena – Free Transform Preset